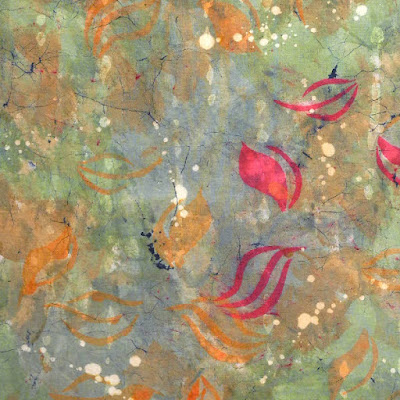
I had a great time at the demonstration I did for the Kerrville Art Club a few weeks ago. My presentation focused on the process of layering and showed the transformation of a piece of cloth in ten layers - from plain white cotton to finished art cloth. One aspect I love about layering is the richness it lends to the cloth. Viewers may not see all the layers, but they all work together to create depth and texture. I like to think of it as similar to a symphony. One may not hear each individual instrument, yet they all contribute to the composition. Likewise, each layer of dye, resist, paint and stitch complete the cloth. Leave out one layer and it just wouldn't be the same. Below is a detail photo of the finished cloth.
 |
| Detail shot of finished cloth |
The following narrative walks through the steps I used to create this cloth. (Action photos are courtesy of Lynn Luukinen. Please excuse the blurs on some of the action photos - I moved too much for Lynn to get a clear shot!)
I use a lot of resists in my work, and they are often the very first step. I like to begin by creating background texture. There are lots of options for this - most of the paste resists work well (flour, oats, grits, potato dextrin, mashed potatoes). I chose flour paste for this cloth. I mixed equal parts of flour and water (this version used bread flour since that was all I had on hand) and spread it over the entire cloth, then let it dry. Once the flour was dry, I scrunched the fabric to crack the paste, then applied dye thickened with sodium alginate.
 |
| Brushing thickened dye over the dried flour paste |
 |
| The finished first layer |
|
|
|
|
|
Before adding background color, I created a layer of my chosen image - a stylized leaf. The leaf is a stencil I created using Grafix stencil film. (This stuff works great - easier to cut than quilting stencil. It does require a delicate hand when washing if using an intricate pattern.) I applied the image using red and yellow-orange thickened dye.
 |
| Adding a stenciled image with thickened dye |
 |
| The completed second layer |
Before adding background color, I reserved some of the white space with another resist. I didn't want a stark white, so I chose Elmer's Gel Glue. It is a water-soluble resist that leaves a soft, ghost-like image.
 |
| Screen printing with Elmer's Gel Glue Resist |
The next step was to add the background color. I chose to apply olive green, blue green and golden brown thickened dyes with a scraper.
 |
| Adding background color with a scraper and thickened dyes |
 |
| The finished fourth layer - note the soft "drip" pattern created by the gel glue |
The resist did not leave enough value contrast, so the next step was to remove color with diluted bleach. I wanted to add texture rather than creating an additional image, so I flicked the bleach on with a brush to create spots.
 |
| After completion of the fifth layer |
At this point it was time to put away the dyes and add a few additional touches with textile paint. I started by adding more of the leaf imagery in an opaque yellow orange.
 |
| Adding more leaf imagery with paint - layer six |
Then I added more value contrast by stippling on dark brown paint with a stencil brush.
 |
| Stippling on brown paint - layer seven |
It needed a little something to brighten it up, so I used copper metallic paint. I wanted just a hint of gleam, so I rubbed it on with my finger.
 |
| Applying copper paint with a finger - layer eight |
Knowing when to stop is always the difficult part. At this point, I felt I was finished with paint and moved on to the final details. I added some hand-dyed fibers with needle felting and a touch of copper leaf.
 |
| Needle felting with hand-dyed fibers - layer nine |
 |
| Applying metal leaf with acrylic medium - layer ten |
Isn't the transformation exciting?


How generous you are with this process! Makes my fingers itch to work on something-thank you.
ReplyDeleteHow wonderful to share your steps! You always seem to have great ideas to layer your pieces. I'm hoping to take some classes, perhaps spring, summer for sure. I have a plan to get some help from you on a background for our wedding ceremony next fall - perhaps if you have an independent practice this spring
ReplyDeleteGreat blog post Lisa! And I have to agree: you are so generous in sharing your steps! I've just begun a new piece using flour paste resist....so it was good to read your blog......but then it's always good to connect with you!
ReplyDeletexo
Really great post Lisa. I enjoyed seeing your steps. Susie
ReplyDeleteLisa, I too thank you for sharing your process. Your class must have been enthralled.
ReplyDelete