For the past 7 years, my home studio has been in one of the extra bedrooms in our home. It is a rather small space and it has become smaller over the years. (With the acquisition of all of my "stuff"!) I finally gave in and appropriated an adjacent room as additional studio space.
I blame studio envy for my decision. It started in March when I had a chance to see Dianne Hricko's studio in Philadelphia. Ohhhhhh what a space! You can see photos of it on her blog. It is huge - probably the size of half of my house. It has wonderful high ceilings, lots of storage space and a huge 12 foot table. Actually I don't know the size of the table, but it seems like 12 feet.
Then last month Barbara Schneider, another friend of mine, moved into a wonderful studio space. You can see photos on her blog. Her space has high ceilings, lots of natural light, plenty of room to move around and even space to hang finished work.
I was feeling too cramped in my small 10' x 13' studio, so the sunroom is now my design studio. By moving the futon, bookshelves and design wall out, I have room for another work table in the wet studio. My new studio "suite" still feels too small, but it is certainly better than before. Maybe in another few years studio creep will kick in again and I'll take over the dining room!
Monday, July 16, 2012
Thursday, July 12, 2012
Art Movie Night
Another aspect of the online class I took with Alyson Stanfield is planning for your continued learning. She gave us a worksheet designed to get us thinking about ways to enhance our knowledge of art in general, art techniques and other topics related to our work. One of her suggestions is to watch art documentaries. Occasionally I'll watch one and I am usually inspired. So we have instituted art movie night in our household. Once a week we watch a documentary or movie focused on an artist or art.
Last week we watched Waste Land, a documentary about Vik Muniz. He is a photographer who creates compositions with unusual objects and then photographs them. He has done work in thread, diamonds, chocolate syrup, soil, dust, junk and trash. I saw his work, Bacchus Astride a Barrel, at a local museum and was fascinated. The documentary is about a series of portraits he created using trash from a landfill in Rio de Janeiro, Brazil. He spent three years there, getting to know the landfill workers who pull recyclable objects from the landfill. He photographed them and then, with their help, created large scale reproductions of the photos using trash. These were then photographed and put up for auction, with the proceeds going to the person in the portrait.
The documentary was inspiring on so many levels. I enjoyed the glimpse into his approach and methods. It was also moving to hear the stories of the people who work in the landfill. I highly recommend this DVD.
What art documentaries are your favorites?
Tuesday, July 10, 2012
Ice Dyeing

I'm a little late on the ice dyeing craze, and this may seem like a strange time to do it, but I finally made time to try it. I read about snow dyeing several years ago and thought it sounded interesting, although not very practical for someone who lives in a warm climate. Ice dyeing makes more sense, and summer is actually a good time, because the mess can stay outside.
The nudge to do this came when I was invited to participate in a friend's booth at the American Sewing Guild conference in August. She invited me to sell my books and DVDs and said that fat quarters would be great, too. Ice dyeing seemed the perfect way to create unique fabric for fat quarter sets.
After doing an internet search, I realize there are many variations. I chose to work with the dyes in their powdered state rather than mixing them into a liquid. I placed a tarp on the ground outside and used a plastic grid from a commercial light fixture to raise the fabric out of the melting ice/dye. I didn't document the process, but I'm doing more later this week, so I'll take photos of my setup. At that time I'll also give more detail about the process I used.
I am pleased with the results, although I have to admit that while it was in process I was not impressed. I had read some comments that the results are similar to what you get with low water immersion dyeing. I found a significant difference. The patterning is hard to describe, but it has a distinctive look. Here are my results (I used Dharma Bronze and ProChem Tobacco on all these pieces):
This is a full and detail shot of a piece of silk dobby noil (from Thai Silks). It is a wonderful fabric and it took the ice dyeing beautifully.


This is a heavy-weight cotton. See how much difference in how the colors took?

This is silk habotai, and it was underneath the two previous fabrics to catch the dye as it dripped down. This looks like a typical low water immersion dye.

This is also cotton, and it was dry when I placed the ice cubes on top. The other fabrics were all wet.

This piece was underneath the plastic grid to catch the drips from the previous cloth.

Have you tried ice and snow dyeing? What was your experience?
Monday, July 9, 2012
Affirming

Last month I participated in an online class offered by Alyson Stanfield called Blast Off. A lot of Alyson's work is focused on marketing, but this class had more of a big picture focus. The course was designed to give artists a jump start by working on their vision, goals, financial reality check and continued learning.
I got a lot out of it and it really has lit a fire under me. Many of the lessons were very useful. One that I particularly like was to make affirmations a part of your daily routine. I have created affirmations in the past and found them to be poweful - in helping me visualize what I want and also in keeping me focused. I just found it hard to make them a part of my daily practice.
Alyson talked about a process of making affirmation cards so that you would have something in your hand to hold and read. After writing out my affirmations, I decided to try it. I used heavy (300 lb) watercolor paper and watercolor pencils. The process of creating them was fun and I've found that holding the cards as I read them is more powerful than just reading my affirmations as a list on a piece of paper. The cards seem to have a sense of energy that I can feel in my hands.
I have been successful at making them a part of my daily journaling/meditation. Let's hope I can keep it up this time!
Do you use affirmations? How have they affected your life?
Thursday, July 5, 2012
The Great Print Paste Experiment

There are a lot of recipes for making print paste, the seaweed-based mixture used to thicken dyes. I have always made mine from scratch, using some combination of sodium alginate, soda ash, urea and water. I've been frustrated over the years because it seems to go bad quickly. By "bad", I mean that it becomes thin and watery. I'm lucky if mine lasts for a month in the refrigerator. So how come people talk about it lasting indefinitely?
While in New Jersey, I was discussing print paste with a friend who says that hers lasts months at room temperature. I asked how she makes it, and found that she uses the Print Paste Mix from ProChemical and Dye that includes calgon and metaphos. Hmmm - could those other ingredients make a difference? I decided to find out. I'm going to do a side-by-side comparison. Today I will mix up my usual recipe and a batch of the ProChem print mix and see how long they maintain the right consistency. I plan to check them every week to see how they are holding up. I'll report back as soon as I have the results.
How do you make your print paste, and how long does it last?
Tuesday, July 3, 2012
Midlife Clarity
That sounds much better than midlife crisis, doesn't it? I wish I could take credit for the term, but I borrowed it from Kenny Loggins. I had one (midlife clarity) in my early 30s. It was a period of re-evaluating all aspects of my life - work, relationships, spirituality, health. It was a difficult period, but I came out better for it. And my journey has been very fulfilling.
I always thought that was it - I went through my midlife clarity early, and I was set for the rest of my life. Ha! I realized last month that I'm going through another one. (Don't worry, I won't bore you with the gory details.) I suppose it makes sense - we are continually changing, as is the world around us. We evolve and grow, and our path changes as well. It is not always comfortable, though. However, I found that just the recognition of it has helped me obtain some peace and clarity. Before, I just felt a sense of disconnection and malaise. Now I am a bit more forgiving of myself and I am more focused on working through it. I know I can't rush it - things will all become clear in their own time. What I can do is allow space for the discomfort and unknowing.
How have you emerged from your own midlife clarity?
Monday, July 2, 2012
Artwork winners!
 |
| Peace Amidst Chaos |
Lynne Allen - silk scarf
Rachel Edwards-Ridder - silk scarf
Diana Sanchez Harwood - silk scarf
Angela Maroun - silk scarf
Carol Mendenhall - silk scarf
Penni Redding - silk scarf
Deborah VanStratum - Peace Amidst Chaos, cover artwork
Stephanie Wilson - Bamboo Sunrise, cover artwork
Judith Winshel - silk scarf
Carol Yingst - silk scarf
As I pulled the names, most were of people I know. I thought, "Oh, no - people will think it's rigged." But then I realized that only 30% of the orders were from people I didn't know personally. Out of the ten winners, I know seven. So I guess the law of probability and sampling really does work pretty well.
For those whose names weren't drawn, I'm sorry. I wish I had enough artwork to give to all of you!
Wednesday, June 20, 2012
Book Giveaway
My new book is hot off the press and C&T Publishing is giving away a copy at the end of the month. You can read a review of the book and find out how to enter on the C&T blog . Good luck to those of you who enter!
Tuesday, June 19, 2012
Simple Pleasures
A cool breeze on a hot summer day. A sunflower in full bloom. Watching kittens at play. These are a few of the things that have given me pleasure in the past week. I've been trying to reconnect with the little things that bring joy into my life. It's easy to let them slip by unnoticed. I often become too wrapped up with what's going on in my head. Thinking about all the "stuff" that's going on in my life. Getting out of that trap and noticing the world around me helps relieve my stress and brings me a sense of peace.
What are your simple pleasures?
Sunday, June 17, 2012
A Father's Legacy

My father is joyful, optimistic and loves to talk to strangers. He really loves to talk to strangers. Waiters, grocery checkers, business patrons and random strangers in the street are all regaled with his tales. As a kid it drove me crazy. Now I just figure, if it makes him happy, great!
We did not have a close relationship when I was young. He was a driven entrepreneur, working long hours with frequent travel. And when he was home we were most likely yelling at each other. ("Stop yelling at me, Dad!" "I'm not yelling! I'm just trying to make my point." It's rather comical, thinking back on it.) For years, I lived too far away to see him on a regular basis. When I moved back to Texas eight years ago, he was within driving distance, so now I am able to see him more often. We have been able to develop a relationship that wouldn't have been possible when I was young.
A few years ago I understood that he had more of an impact on who I am than I had realized. There are the similarities born of genetics - positive outlook, goal oriented, quick-tempered. But I think his biggest legacy to me was believing in the power of one's thoughts. He had this philosophy long before it became popular. I had a strong role model in the impact of visualization, positive self-talk and believing in oneself. He didn't explicitly teach me those beliefs, but I absorbed them nonetheless. I believe that a lot of what I have accomplished over the years is a result of that foundation I received when young.
So, thanks, Dad! For that and everything else you've brought into my life over the years.
What legacy has your father left you?
Thursday, June 14, 2012
Slowly Breaking Through
A month ago, I dedicated a week to an art retreat at home. My husband was out of town, so it was just me and the kitties. I feel as if I haven't been very productive over the past six months. Technically that is not true - I have created a number of pieces. But I have gotten so used to working in a series, I feel that single, stand-alone pieces don't count.
The retreat provided me with much needed time for walks in nature, meditation, reflection, playing with kittens . . . oh yes, and studio time. I had a flash of insight about a series I want to work on, but the work has progressed slowly. Since the retreat, I've felt torn between a number of ideas. I have had difficulty choosing which direction to go. Another flash of insight two days ago - it doesn't really matter which direction I go, as long as I do something!
Amazing how freeing that realization has been. I have created two studies for larger pieces I'm entering in an exhibition later this year. And although they didn't turn out exactly as expected, I know I'm on the right track. Each day I clarify my vision just a little bit more. Oh, and if you are wondering if I've kept my commitment to show up every day - the answer is yes. I have spent at least several hours each day in the studio since June 1 (except one Saturday - it's ok to take one day off - or am I just rationalizing?!)
Below is a photo of one of my studies. It is not complete, but I do like it enough to finish it.
What you you do to help you through periods of indecision and lack of inspiration? I would love to hear your thoughts.

Tuesday, June 12, 2012
Working with Resists - Tip #7
This week I'm winding up my resist Tuesdays series with my final tip - Have fun! Isn't that why we create? Yes, we are expressing ourselves, adding beauty and/or meaning to the world and perhaps even healing ourselves in the process. The time spent exploring and playing with new techniques allows us to do those things even better.
I hope that these posts over the past two months have inspired you to try working with resists. I would love to hear about your experiments. And if you are inspired to buy my book and try out the techniques, that's great, too! Please bear with me for a moment of shameless self promotion. My book will be available next week (finally!) My shipment is on a FedEx truck at this moment, headed to San Antonio. I created eight silk scarves for the book using the different resist techniques. Anyone who orders the book from me before the end of June is automatically entered into the drawing. Below are photos of some of the scarves.
Happy Resisting!


Tuesday, June 5, 2012
Working with Resists - Corn Dextrin
Corn dextrin is a great all-purpose resist. It is very versatile - you can stamp it, screen print it, stencil it, brush it. It looks a lot like potato dextrin when mixed, however it doesn't crack once dry. If you have tried working with cornstarch, it is similar, however I find it easier to mix. As with most resists, a heavier coating ensures a stronger resist. Here are a few photos of cloth created with corn dextrin.

Corn dextrin works great with stencils. It is just the right consistency to spread with a scraper.

I love using the free-form "drip" approach. I guess this piece is more structured than free-form, but you get my point.

This piece reminds me of pine cones. The dextrin was brushed through a lacy cloth. You can see the lighter areas where the brush (fully loaded with dextrin) brushed over the cloth. And the areas with more definition when there was less dextrin on the brush.

Brayer printing deposits a lighter coating of the resist, so it has a softer effect. This piece was brayer printed over a textured mat.

Here's another brayer print, over the ubiquitous bubble wrap. Again, a nice soft effect.
How have you used corn dextrin?
Read my tips for working with resists
Read about working with sugar syrup
Read about working with acrylic medium
Read about working with flour paste
Read about working with oatmeal
Read about working with potato dextrin
Read about working with soy wax
Read about working with commercial resists

Corn dextrin works great with stencils. It is just the right consistency to spread with a scraper.

I love using the free-form "drip" approach. I guess this piece is more structured than free-form, but you get my point.
This piece reminds me of pine cones. The dextrin was brushed through a lacy cloth. You can see the lighter areas where the brush (fully loaded with dextrin) brushed over the cloth. And the areas with more definition when there was less dextrin on the brush.

Brayer printing deposits a lighter coating of the resist, so it has a softer effect. This piece was brayer printed over a textured mat.

Here's another brayer print, over the ubiquitous bubble wrap. Again, a nice soft effect.
How have you used corn dextrin?
Read my tips for working with resists
Read about working with sugar syrup
Read about working with acrylic medium
Read about working with flour paste
Read about working with oatmeal
Read about working with potato dextrin
Read about working with soy wax
Read about working with commercial resists
Thursday, May 31, 2012
Show Up Every Day
While captive on an airplane recently, I read the in-flight magazine from cover to cover. It had a short interview with the author, Danielle Steel, and her quote caught my eye. She said "if there's a formula at all to what I do, its this: [I] put my butt in my chair every single day. " Translate that to my profession and it becomes "I put my hands on the cloth every day." Not a bad idea. I know you've heard this from me before, but it is difficult to juggle all the aspects of my "job". As someone who has to earn a living from her art, I have to balance income producing activities (teaching and writing) with creative activities that don't have an immediate income attached. The studio time may lead to sales and income at some point, but there is definitely a lag between creation and sale.
I confess that I don't go into the studio every day. As my activities on the income producing side have increased, my studio time has decreased. But for the next 6 weeks, I have no excuse. No classes until late July. Can I actually commit to spending part of every day in the studio? I don't know, but I'm going to give it a try!
I confess that I don't go into the studio every day. As my activities on the income producing side have increased, my studio time has decreased. But for the next 6 weeks, I have no excuse. No classes until late July. Can I actually commit to spending part of every day in the studio? I don't know, but I'm going to give it a try!
Tuesday, May 29, 2012
Working with Resists - Commercial Resists
I love commercial water-based resists for their ease of use. No mixing is involved - just open the bottle and pour! Jacquard, Presist and Inkodye are three of the many brands available. I was introduced to water-based resists years ago when I painted on silk. I created detailed drawings with the resist and then painted inside the lines using silk dyes. When I transitioned to other surface design techniques, I didn't realize how versatile those resists can be. They go way beyond the traditional squeeze-on application. Here are a few of my favorite ways to use them.

I love using my garden as inspiration and as a printing tool! These are printings of rose leaves from my backyard.

I'm drawn to the soft, subtle effect of this piece. It was created by brushing water based resist through a mesh laundry bag.

Compressed sponges are the perfect stamping material. They are very thin, which makes them easy to cut with scissors or a craft knife. Once they are placed under water, they swell to the thickness of a kitchen sponge.

Commercial resists are particularly suited to screenprinting. The consistency is smooth and easily penetrates a silkscreen. This is a thermofax image.
Back to the old familiar ways - the resist was applied with a squeeze bottle.
What are your favorite ways of applying water-based resists?
Read my tips for working with resists
Read about working with sugar syrup
Read about working with acrylic medium
Read about working with flour paste
Read about working with oatmeal
Read about working with potato dextrin
Read about working with soy wax
Read about working with commercial resists
Read about working with corn dextrin

I love using my garden as inspiration and as a printing tool! These are printings of rose leaves from my backyard.

I'm drawn to the soft, subtle effect of this piece. It was created by brushing water based resist through a mesh laundry bag.

Compressed sponges are the perfect stamping material. They are very thin, which makes them easy to cut with scissors or a craft knife. Once they are placed under water, they swell to the thickness of a kitchen sponge.

Commercial resists are particularly suited to screenprinting. The consistency is smooth and easily penetrates a silkscreen. This is a thermofax image.

Back to the old familiar ways - the resist was applied with a squeeze bottle.
What are your favorite ways of applying water-based resists?
Read my tips for working with resists
Read about working with sugar syrup
Read about working with acrylic medium
Read about working with flour paste
Read about working with oatmeal
Read about working with potato dextrin
Read about working with soy wax
Read about working with commercial resists
Read about working with corn dextrin
Monday, May 28, 2012
How About Some Paw Prints With That?

Yesterday was a day filled with adventure. What I thought would only take a few hours ended up taking all day. I was filming a short video tutorial and had a little help from my friends (aka my cats). Babs (a beautiful Russian Blue) decided that she wanted to be in the movies, and jumped onto my work table right in the middle of a set. I shooed her away, and started over. Then Callie, (a fluffy calico) decided she needed to sharpen her claws on the rug. She was off screen, but was going at it very noisily. OK, let's try this one more time - third time's the charm, right? I made it all the way through the tutorial. Babs jumped up at the very end, but I had already finished. Except she jumped right into the wet paint and left turquoise paw prints over all the samples on the table. And I still needed to shoot the close-ups, so I needed those samples!! Fortunately, a quick rinse in cold water removed the paw prints. Good thing I love those cats!
Tuesday, May 22, 2012
Working with Resists - Soy Wax
For years, I was drawn to the look of batik, but I didn't want to deal with the wax removal. When I learned that soy wax washes out with hot water, I rushed to try it. Now I keep a supply in my studio at all times. Compared to some of the other resists, it is easier to maintain the "white space" with soy wax while hand painting. It does tend to break down somewhat in an immersion dye bath, but I love the soft look that creates. Soy wax can be applied with a variety of tools or simply brushed onto the fabric. Here are some of my samples.

See how the white background was maintained. This feature allows great possibilities for over dyeing.

Even though it is a soft wax, it will crack to create an interesting texture.

This leaf was created by applying soy wax through a stencil. After washing out the wax, a layer of dye was hand painted on the cloth to give it a hint of color.

When layered with other resists, you can achieve much depth and complexity.

You can even use soy wax for shibori. How have you used soy wax in your work?
Read my tips on working with resists.
Read about working with sugar syrup.
Read about working with acrylic medium.
Read about working with flour paste.
Read about working with oatmeal.
Read about working with potato dextrin.
Friday, May 18, 2012
On Writing a Book
Yesterday I saw my book in print for the first time. I only had a chance to flip through the pages quickly, but I'm pleased with what I saw. My copy is awaiting me back home, so I'll have a chance to look at it more closely this weekend.
The entire experience has been very positive, although not entirely what I expected. Everyone with whom I've worked has been enthusiastic, helpful and supportive. I feel fortunate to be working with the wonderful publishing team at C&T.
I was amazed that the actual writing is only a small component of the project. I spent as much time creating samples as I did writing. And the prep for the photography, along with the photo shoot itself, took many hours. A lot of time went into figuring out what how-to photos would best complement the text and what equipment, materials and supplies were needed for those photos. There were also many hours of review and revision.
The aspect that was most surprising is the length of time it takes to produce a book. I finished my part last April, so the entire production process has taken over a year. The manuscript was reviewed by several different editors for content, accuracy, grammar and spelling. Fortunately my book did not require any re-writes or revisions. The next step was putting the words and photos together in a meaningful way. And then the final layout and design. All of that was complete by year-end and the book was sent off to the printer. The actual distribution date is June 18, so there is still another month to go.
I feel a bit overwhelmed when I think of all the teamwork and cooperation needed to accomplish the task. I tend to be pretty independent and think I can do everything by myself. This truly was a team effort and I am thankful to all those who had a hand in the book.
Thursday, May 17, 2012
Back in Kansas City
C&T Publishing invited me to attend Quilt Market in Kansas City to promote my new book. It will be a whirlwind trip - presentation to quilt shop owners today and a book signing tomorrow, then back on a plane for home. I arrived yesterday.
Since this is my first time doing anything like this, I've been practicing my presentation whenever I can. Yesterday I found myself in the Pizza Hut at DFW in between flights. The place was empty, so after lunch I decided to run through my presentation. I closed my eyes to better concentrate. When I opened my eyes 20 minutes later, the place was packed. A man kept glancing at me surreptitiously. Maybe they though I was meditating. Maybe they thought I was dead. Maybe they didn't even notice.
Well, I'm off to get breakfast and practice my presentation a few more time. More later.
Tuesday, May 15, 2012
Working with Resists - Tip #6
#6 Understanding the Variables
One of the trickiest aspects of achieving consistency when working with resists is to understand all the factors that affect the end result. Years ago I had an early lesson in understanding variables when working with gel glue. I made three mistakes - I applied it with a rubber stamp, I used silk noil and I immersed it. The end result was that the stamped image did not show up at all. Individually, those actions might be fine, but together they resulted in failure. Rubber stamps are not the most effective way to apply gel glue, particularly on a heavy fabric: a sponge stamp is a much better choice. Because gel glue is water soluble, it doesn't hold up well in an immersion. It will work with a low water immersion and a heavy layer of glue, but not with a light application on a heavy fabric.
I've had numerous lessons in what affects the end result. And I'm still learning. I'm not sure I'll ever have them all worked out, but each time I work with resists, my knowledge increases. Below is a partial list of the seemingly infinite variables. What other variables have you found in your work with resists?
Fabric
The weave or texture of the fabric affects the way an image or pattern looks. It may also affect the ease with which the resist washes out.
The weight or thickness of the fabric affects whether the resist completely penetrates the fabric and how the dye reacts with the fabric.
The Resist
For resists that require mixing, the resist to water ratio affects not only the look but also the resist's ability to block dye or paint.
The length of time the resist sits before use may affect the crackle pattern for oatmeal and potato dextrin.
The length of cooking time (for sugar or oats) affects the resulting pattern.
Different brands of commercial water-based resists have different properties. Some are more water soluble, some spread more on the fabric, some work well with immersion.
The Application Technique
The thickness of the application affects the resist properties - a thicker layer means the dye is less likely to breach the resist.
The thickness of the application affects the crackle pattern for paste resists. Generally a thicker layer results in larger cracks, a thin layer results in a finer crackling pattern.
The Dye or Paint
The way the dye is applied (immersion, liquid hand painted, thickened hand painted) can create significant differences in the end result.
The consistency of the thickened dye can affect how much dye penetrates the resist.
Read previous tips for working with resists
Read tip #7
Read about sugar syrup resist
Read about acrylic medium as a resist
Read about flour paste resist
Read about oatmeal resist
Read about potato dextrin resist
Read about soy wax resist
Thursday, May 10, 2012
A Picture in My Head
How can I share with you the image I can see very clearly in my mind? I can't quite find the words to capture it. Yet that is all I have after my week-long art retreat. A vision - still somewhat nebulous - of my next series. One might say that I wasn't very productive - no cloth to show for all that time. Yet I feel that it was very productive. I had a flash of insight while sitting by the creek one morning. That insight, along with many hours of reflection, journaling and meditation, gave me enough clarity to move forward. My fabric has been ordered and will arrive tomorrow. Guess what I'm doing this weekend?
Thursday, May 3, 2012
Art Retreat in Place
I am devoting the next six days to an art retreat at home. I thought about going away somewhere, but there were too many reasons to stay home. And I realized that it's better to be here where I have all my supplies rather than trying to pack up everything.
I started getting a little stressed in anticipation - the expectations were sky high. I was putting pressure on myself to get as much done as possible. Last night I realized that I need to build in some quiet time to connect with my intuition. So I won't just be in the studio 10 hours a day. It will be a true retreat in that I am taking time every day for meditation, reflection and spending time in nature. And I will be minimizing my computer time.
I spent the past few days cleaning house and studio to minimize my distractions. Today it's an early start for a walk at a local nature center. Then on to the studio to play with soy wax dye crayons.
Have a great week - I'll be back next Thursday.
Tuesday, May 1, 2012
Working With Resists - Potato Dextrin
It took a few years for me to really appreciate potato dextrin. It is best known for its distinctive crackle pattern, however I have found that it can be very versatile. It works well in a squeeze bottle, stamped or stenciled, brayer printed and even screen printed. It washes out easily but it can withstand low water immersion. The main downside is that it is more costly than other paste resists. Covering a large piece of cloth for the crackle effect can get expensive. But it does look fabulous!

Here is the classic crackle pattern. The dextrin was applied unevenly, resulting in some areas with fine cracks and some areas with larger cracks.

Potato dextrin was brushed through a plastic grid, then painted with thickened dye. When using objects as stencils, the result is not always as expected. Instead of creating neat squares, the dextrin pooled around the grid, resulting in this abstracted pattern.

Potato dextrin brushed through lace curtain, painted with thickened dye. Prior to being used as a stencil, the lace was stiffened with a coating of acrylic paint.

Potato dextrin applied with a brush, painted with thickened dye

Potato dextrin applied with a sponge stamp, painted with thickened dye.

Potato dextrin applied with a sponge stamp, immersed. Notice how more of the dye breached the resist, resulting in a softer image.

Potato dextrin brayer print with a chocolate box liner underneath the cloth.

Potato dextrin applied with a circular brush.
Read my tips for working with resists
Read about working with sugar syrup resist
Read about working with acrylic medium resist
Read about working with flour paste resist
Read about working with oatmeal resist
Read about working with soy wax resist
Tuesday, April 24, 2012
Working with Resists - Tip #5
Learn
the characteristics of each resist
There are a host of substances that can be used as a resist and each has different properties. Some are more water-soluble than others. Some crack when dried. Some remain permanent on the fabric even after washing. You are more likely to be pleased with your results if you choose a resist that matches your intended application and dye technique. For example, to achieve a finely detailed image with crisp edges, a silkscreen or thermofax is the perfect tool. That eliminates using oatmeal, flour paste or soy wax as a resist, because none of them go through a silkscreen easily. Commercial water-based resists, acrylic medium and gel glue are the perfect consistency for screen printing and each will yield a slightly different result.
The cloth below was screen printed with
Jacquard water-based resist and with acrylic medium, then brushed with thickened dye. The acrylic medium
left a softer, ghostly image and the Jacquard left a more pronounced
image.

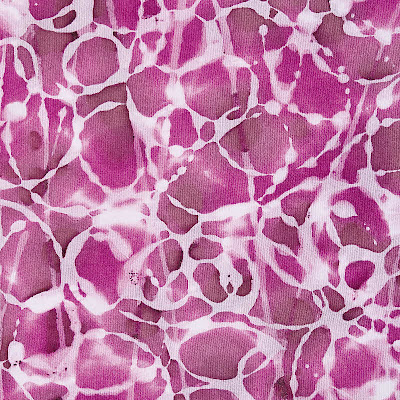
This cloth was created using flour paste applied with a squeeze bottle. Many resists could have been used to create a similar effect, however flour was chosen for it's cracking properties. The cracks add interest to the circle images.

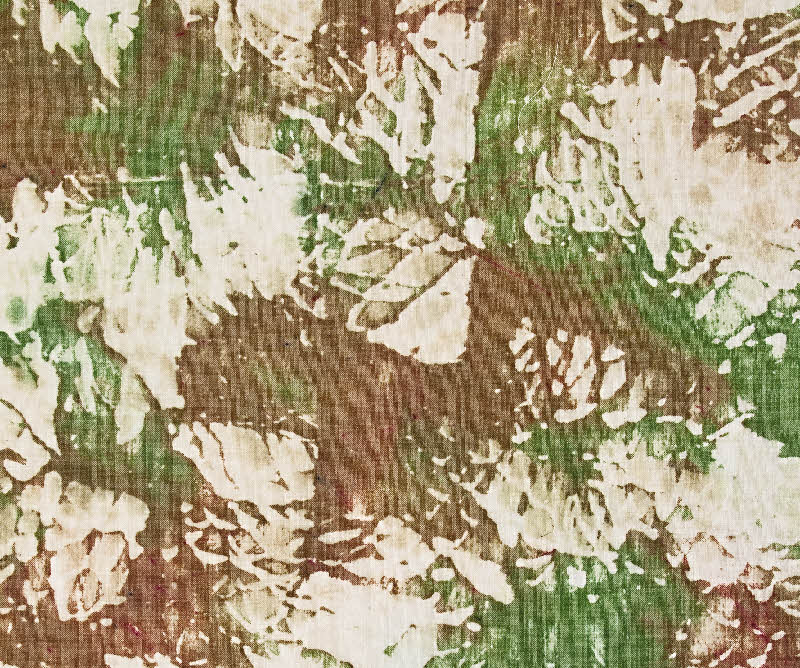
This cloth employs both soy wax and flour paste resists. The soy wax was applied with a stencil. Then flour paste was applied with a rag, creating a scumble effect. After the flour paste was dry, the cloth was immersed. The soy wax holds up better than flour paste in an immersion, so the leaves retain more of the original fabric color.

Read previous tips
Read next tip
Read about sugar syrup resist
Read about acrylic medium resist
Read about flour paste resist
Read about oatmeal resist
Read about potato dextrin resist
Read about soy wax resist
Thursday, April 19, 2012
Are You Any Good?
I had a conversation with the gentleman seated next to me on my plane to Philadelphia earlier this month. He asked what I did, so I had a chance to try out my "elevator conversation" - the two sentence description of my work. He asked me "Are you any good?" and I replied with a smile, "Yes, I am."
It seemed like a strange question and there was a time when I would have given a self-deprecating answer. We are raised to be humble and not talk about our accomplishments. But I think that attitude can have a negative impact. We need to believe in ourselves if we expect anyone else to believe in us.
So, how about you all? Are you any good at your art?
Tuesday, April 17, 2012
Working With Resists - Oatmeal
I first read about using oatmeal as a resist in Sue Beever's book, Off the Shelf Fabric Painting. I really liked the look, but I didn't like the cooking! I experimented with some no-cook variations and now oatmeal is a staple in my pantry and in my art.
I'll be honest, oatmeal is a little more work than some of the other resists (primarily in the wash-out), but it creates a truly unique look. You can achieve the signature oat-y crackle or a variety of marbled, wash effects. I didn't realize it's versatility until I tried a few variations on the basic technique. And of course it has the benefit of being inexpensive and readily available. The other thing I love about oatmeal is that it is very forgiving. Almost any variation in the oats to water ratio or in the amount of time it stands before using will produce good results, as will any method of applying the oatmeal.
The oatmeal was applied with a brush - note the brush strokes on the upper portion of the cloth.
Here, the oatmeal was applied with a squeegee. You can see how that
technique spreads the oats out, leaving more space between them.
Using a spoon to apply the oatmeal, as above, allows more control, making it easier to create a more even oat pattern.
This oatmeal was also applied with a spoon.
Read my tips for working with resists.
Read about working with sugar syrup resist.
Read about working with acrylic medium resist.
Read about working with flour paste resist.
I'll be honest, oatmeal is a little more work than some of the other resists (primarily in the wash-out), but it creates a truly unique look. You can achieve the signature oat-y crackle or a variety of marbled, wash effects. I didn't realize it's versatility until I tried a few variations on the basic technique. And of course it has the benefit of being inexpensive and readily available. The other thing I love about oatmeal is that it is very forgiving. Almost any variation in the oats to water ratio or in the amount of time it stands before using will produce good results, as will any method of applying the oatmeal.
 |
| Oatmeal, cooked |
 |
| Oatmeal, uncooked |
 |
| Oatmeal, cooked |
 |
| Oatmeal, uncooked |
Read my tips for working with resists.
Read about working with sugar syrup resist.
Read about working with acrylic medium resist.
Read about working with flour paste resist.
Saturday, April 14, 2012
Intentional Play
I have two ways of approaching the creative process. Sometimes I have a vision for a series of pieces. I have a message I want to communicate (or more often, it's a feeling I wish to convey). I work deliberately to create that vision. This often means that I do samples to test colors and even create a mini-version of the composition. This tends to be a slow process and sometimes I get bogged down in the detail.
The other way in which I work is to do what I call "intentional play". I'm playing, in the sense that I have no pre-conceived vision or expectations for the cloth. I take it one step at a time and let the cloth "speak to me" to build each layer. It is intentional in that I choose a surface design technique, a certain approach to color or a compositional style and focus on that as I work on the piece. The spontaneity is a nice complement to the more planned approach.
Right now I have some ideas for a series based on the first approach, but they are still forming and are not yet ready to be applied to cloth. So my studio time has been spent on the second approach. I have a pile of fabric in various stages of printing and dyeing. Each day I add another layer, wash them all out the next morning and start on the next layer. I have no idea what I'll do with them, but I'm not concerned about that now.
Below are photos of some of the things I'm working on. All were created with one or more resists (of course!) and will end up with several more layers before I'm through.


Subscribe to:
Posts (Atom)

